How links are different when presenting in Zoom or Teams
PowerPoint allows you to insert a link to a website or file from another program on any shape, image, or text. This allows you to jump directly to that other content during the presentation simply by clicking on that object on the slide. This is a great way to incorporate different content that engages the audience. How does this change when you present on a virtual platform like Teams or Zoom?
Links on slides still work when you are presenting PowerPoint in a Zoom or Teams meeting. When you click on the link, the other content opens. The challenge is that the meeting platform doesn’t know that you now want to share that other content with the attendees. It won’t automatically show the browser or other program in the meeting.
Create links from images to give visual continuity
I suggest that when you are using links in a virtual meeting, you create those links from images of the content you will be showing. This gives the viewers visual continuity. In a meeting room you provide the continuity for the audience but on Zoom or Teams your video is small in the corner of the screen so the visual provides that continuity.
Take a screen capture image of the website, web page, or file in the program. You can use the Windows Snip & Sketch app by pressing Windows+Shift+S and drawing a rectangle around the portion of the screen you want to capture. On a Mac you can use Command+Shift+4 and select the portion of the screen you want to capture.
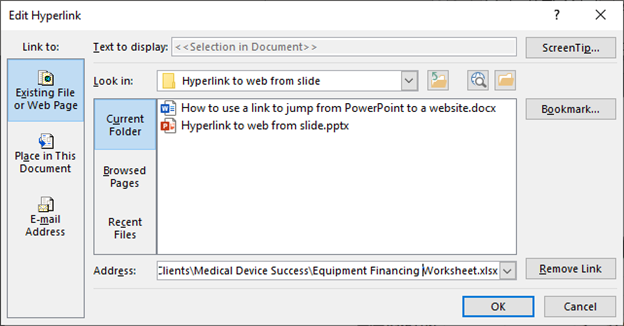
Add the image to the slide. On the Insert ribbon click on the Link button. For a website, copy the URL from the browser address bar and paste it into the Address line of the dialog box.

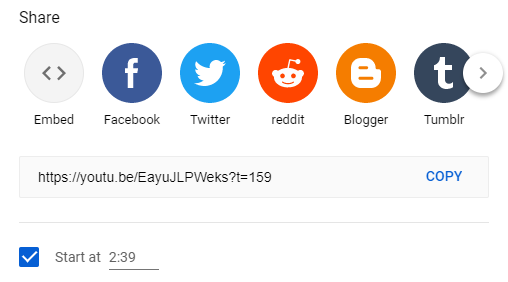
For a YouTube video you can use the Share button below the video and select whether you want to start the video at the current location. This can be a good way to jump directly to the segment of the video you want to show.
For a file from another program, use the file explorer in the dialog box to locate and select the file, such as an Excel file in this example.
Use two screens so you can share a screen not a window
The best approach is to use two screens when presenting with links. This way you can share one screen with the meeting attendees. This screen will be where all of the content – PowerPoint Slide Show, browser with website or YouTube video, and other programs – will appear.
If you want to have a cleaner appearance when other programs are showing, you can choose to hide the taskbar in Windows and the dock on a Mac.
Set which screen PowerPoint will use for the Slide Show
On the Slide Show ribbon in PowerPoint, use the drop down list of monitors to select the monitor you want the Slide Show to appear on.
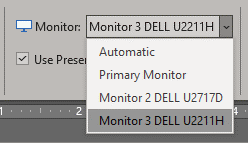
This makes sure that the slides show on the monitor you will be sharing in the meeting.
Move the browser or other programs to the screen you are using for the Slide Show
To make sure that the browser and other programs open on the screen that will be shared with the attendees, drag them to that screen and make them full screen so that when they appear they fully cover up the slides. You don’t have to open the files or websites you will be sharing. You can just have the programs open.
Share the screen in the meeting, not a window
In Zoom and Teams you have the option to share a screen or share a window when sharing content in a meeting. Share the screen that you have decided will contain all the content instead of sharing the Slide Show window. The icon for both the screen and the window will likely look the same so make sure you are sharing the screen.
Use the link during the presentation
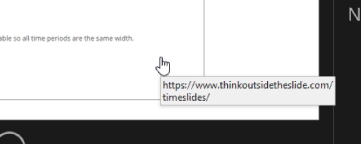
To activate the link while presenting, click on the image that contains the link. It is often easiest to do this in Presenter View on the screen that is not being shared in the meeting. This way the audience doesn’t see your cursor moving on the slides. If you are not using Presenter View you can click on the image on the slide.
If the link is to a website or YouTube video, the browser will open and load the content. If the content is a video, make sure to turn on the sharing of system audio in the meeting platform so the attendees hear the audio of the video. If the YouTube video has ads, you will see those before the video starts.
If the link is to a file from another program, you may see a dialog box warning of the potential danger of opening other content. Select the option that allows you to proceed to open the link and display the content. Sometimes the file will open behind the slides. Click on the app icon in the taskbar to select that window to show on the screen.
The website, YouTube video, or file will now be displayed full screen and the attendees will see it because you are sharing the screen. You have full functionality within the program so you can edit or save any content.
When you are done with that content, minimize or close the browser or program. It disappears from the screen and the attendees see the slide again. You may need to click on the Presenter View or Slide Show window in order to return operating system focus to PowerPoint. Then you can proceed with your presentation.
If you only have one screen
If you only have one screen, you can use the instructions above and run Slide Show full screen on your screen, bringing up the other content as you click on the links. You will not be able to see your speaking notes on the screen but you could access them on another device as I explain in this article.
If you want to use Presenter View so you can also see your notes, this becomes more complicated. In Zoom you can share just your slides when in Presenter View by sharing a portion of the screen (I have articles and videos for Windows and Mac that show how to do this). To switch what you are sharing you need to pause what you are sharing, click on the link to open the new content, use the New Share button to select the new content (window or full screen), then resume sharing. I would suggest you use the window or screen sharing for the other content instead of changing the portion of the screen you are sharing. It makes it much easier when you want to return to showing your slides. You would need to follow the same steps to return to sharing your slides. This article and video shows you a similar sequence of these steps in Zoom.
Teams does not have an option to share a portion of the screen so sharing slides when using Presenter View with one screen is different. In Windows you can share the hidden Slide Show window as I explain in this article and video. After you click the link to open the new content, you would stop sharing the slide show and start sharing the window with the new content. Teams does not offer a pause/resume sharing function or a way to share new content without first stopping sharing the current content.
With Teams on a Mac with one screen there is no way to use Presenter View and share just your slides with the attendees. You either need to connect a second screen (this article and videos show nine options for connecting a second screen) or use full screen Slide Show mode with your notes on an external device as described above.
Plan how you will speak through the transition
After you click on the link, the new content does not instantly appear on the screen. It takes a few seconds to load and possibly a little longer if it is loading complex content from a website or you have to approve the content of a file. You don’t want this to be an awkward silence for the attendees. Plan what you will say to introduce why you are going to show some other content, click on the link, and continue with an explanation of what they will see and why this content is important to the attendees while the content is loading. This makes the transition smoother for the attendees and helps your presentation flow better.
Also plan the transition back to your slides. As you are moving back to your slides, talk about how the content you showed ties into the topic you were presenting and how it naturally moves you onto the next item you will be discussing. It makes the presentation flow smoothly for the audience.
Video of these techniques
Here is a video of me demonstrating these techniques.

Dave Paradi has over twenty-two years of experience delivering customized training workshops to help business professionals improve their presentations. He has written ten books and over 600 articles on the topic of effective presentations and his ideas have appeared in publications around the world. His focus is on helping corporate professionals visually communicate the messages in their data so they don’t overwhelm and confuse executives. Dave is one of fewer than ten people in North America recognized by Microsoft with the Most Valuable Professional Award for his contributions to the Excel, PowerPoint, and Teams communities. His articles and videos on virtual presenting have been viewed over 4.8 million times and liked over 17,000 times on YouTube.