The problem
PowerPoint Presenter View is popular because it allows you to share your slides with the audience when connected to a projector or TV and you see your speaking notes. You can also access some of the expert features of Presenter View like jumping seamlessly to any slide, drawing on the slide, or zooming in on the slide while presenting (learn more about the expert features in this article).
Presenter View works best with two screens, which is what is was designed for. The problem is that when people started working from home, they brought the corporate laptop home and have limited space. No second monitor or screen means you can’t use Presenter View like you did in the office.
The best 1 screen solution
When you display your slides full screen in Slide Show mode you can actually switch to Presenter View and share the hidden Slide Show window in the Zoom meeting. This way your attendees see high-res slides while you see your notes and have all the expert features of Presenter View. You can watch how to do this for Windows and for the Mac.
Two other 1 screen solutions & potential downsides
I’ve previously published two solutions for using Presenter View if you only have a single screen. Both work but have potential downsides.
The first solution is to use Presenter View Preview and use the Advanced sharing option in Zoom to share a portion of the screen. You share just the current slide portion of the Presenter View screen so the attendees see the slides while you see the full Presenter View screen. This article and video explain this solution. You can access the expert features of Presenter View using the Pause and Resume feature of Zoom as I explain in this article.
The downside to this solution is that the slides may not appear clear to your attendees depending on the resolution of your laptop screen. If you have a lower resolution laptop screen, like a common 1366 x 768 resolution screen, the resolution of the slides when sharing just a portion of the screen may make the slides appear fuzzy to those with higher resolution screens.
The second solution I published is to use a video capture device to create a “virtual” second screen in Windows. Then you can use the normal two-screen Presenter View with all the features. This does require a video capture device, an HDMI cable, and an open USB port on your laptop. This may be bulky for a tight home work setup, requires a driver to be installed on your laptop, and you may not have a free USB port on newer laptops that may only have two ports.
The best solution I’ve found so far to add a second screen
Since Presenter View is natively built to use two screens, I’ve recently discovered what I think is the best solution I’ve come across so far to add a second screen. It is to create a “virtual” second monitor using a Virtual Display Emulator Plug. This small HDMI device makes your laptop think that you have a second monitor attached. Then you use Presenter View as you would with two monitors and share this “virtual” second screen in Zoom. Because it is a hardware solution that does not require any drivers to be installed, it should be safe in almost all corporate IT environments.
What is a Virtual Display Emulator Plug
This device is also sometimes called a ghost monitor. It is used to make a computer think it has a monitor attached when it doesn’t. You might be asking, Why would anyone ever use this? This device is used in industrial situations for control computers that control machinery and do not have monitors. It allows technical staff to remotely connect to the computer and have a high resolution display of the processes that the computer is controlling. Without this device, a computer may not run properly or only allow a very low resolution default display which makes it hard to work with when accessing it.
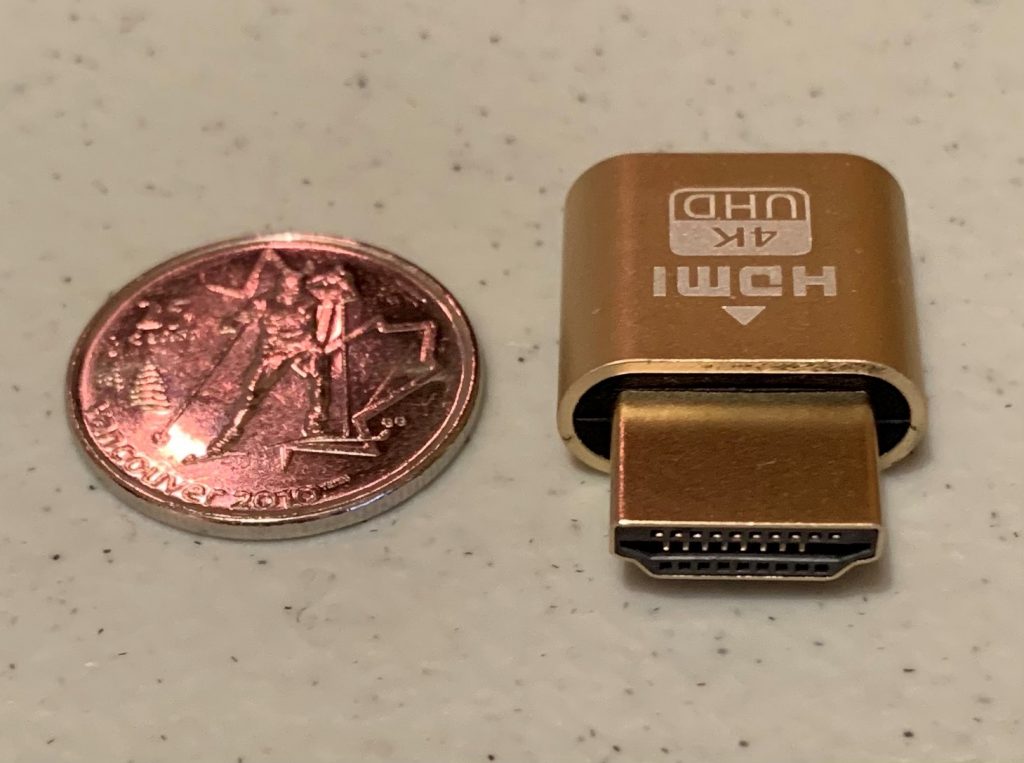
It is a very small device that has an HDMI connector at one end and a small chip at the other end in a small enclosure. The chip emulates a high-res monitor. Here’s how small mine is compared to a quarter.
You can buy these plugs online. I got mine from a supplier of technology to the mining industry, showing how these plugs are used primarily for industrial purposes – at least up to now. You can get them through Amazon as a single plug, a two-pack, three-pack, or six-pack.
Connect the Plug to your laptop
To create a “virtual” second monitor with this plug, simply connect it to the HDMI port on your laptop or connect it to the adapter you usually use to connect an HDMI screen or projector to your laptop. My laptop requires an adapter so that is what I would use.
Check the second display in Windows
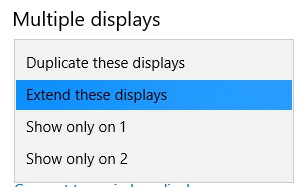
After you have connected the plug to your laptop, check the Display setup in the Windows settings. You should see two displays now connected. If the image shows one screen with 1|2 on it, you need to change the Multiple displays setting to be Extend these displays.
You should now see two separate displays in the image of the displays. Click on the second display and check the Display resolution for this second screen. Depending on what plug you have, it may list different resolution options. As long as you select 1280 x 720 your slides will be clear to the audience. If your plug defaults to 1920 x 1080 that will work fine as well. You may want to consider the lower resolution if your attendees are using slower connections or cellular connections. Resolutions higher than 1920 x 1080 will not give the audience any better of an image and will slow down the display of your slides resulting in a poorer experience for the attendees (this article has more suggestions if attendees are using slower connections).
Set up PowerPoint to use Presenter View and a second screen
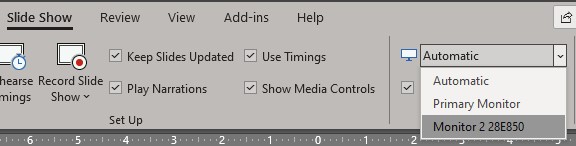
Now that your laptop thinks it has a second screen, you can set up your PowerPoint file to use Presenter View and select which screen the slides should be displayed on. In PowerPoint on the Slide Show ribbon, check the Use Presenter View checkbox.

Use the drop-down list of monitors to select the plug as the monitor to display the slide show on. It will likely be referred to as Monitor 2 and a model number of numbers and letters that refers to a chip or other identifier in the plug.
Start Presenter View
Start your presentation in Slide Show mode using Presenter View. You should see Presenter View fill your laptop screen. Use the full screen/windowed button to switch to the windowed mode and reduce the size of the Presenter View window so you can see the Zoom controls.
You can confirm that there is a second screen showing the slides by clicking on the Display Settings button in Presenter View and selecting the Swap Presenter View and Slide Show option which swaps the Slide Show and Presenter View between the laptop screen and the “virtual” second screen.
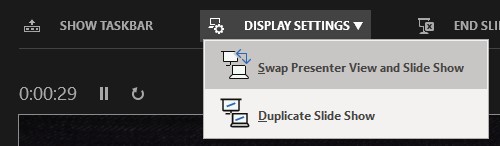
When viewing the Slide Show on the laptop you can return to Presenter View by clicking on the three dots in the lower left corner of the slide, select the Display Settings menu item and selecting Swap Presenter View and Slide Show in the sub-menu that appears.

Share second screen in Zoom
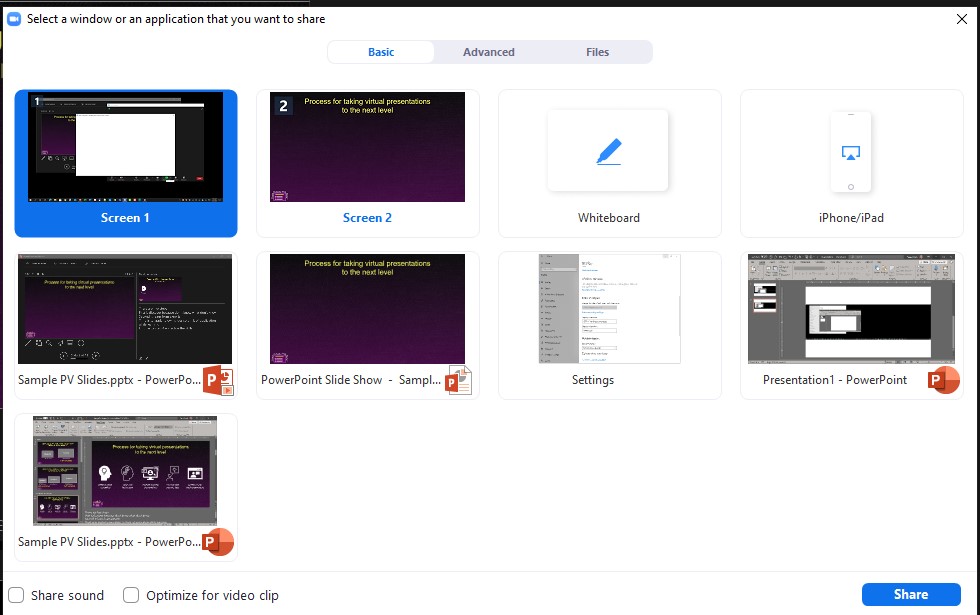
In Zoom, share the second screen, the one with the slides being shown full screen. Here’s what the Zoom sharing dialog would look like (Screen 2 would be shared).
Deliver your presentation using Presenter View
Once the audience sees the screen with your slides, you can start delivering your presentation using Presenter View. Don’t forget that Presenter View has some features that you make great use of in virtual presentations as you can see in this article and video.
When done, end the presentation and disconnect the plug
Since PowerPoint thinks you have a second screen connected, end your presentation the same way you would if you had a physical second screen. Stop sharing the screen in Zoom, end the meeting, and disconnect the plug. In most cases the next time you connect the plug the laptop will recognize the plug as a monitor that has been connected before and extend the desktop instead of using the default of duplicating it.
Use Zoom shortcut keys in case Zoom puts the controls on the ghost monitor
One potential issue with this method is that Zoom may put the meeting control bar on the ghost monitor when you share the screen. As best as I can tell, Zoom puts the controls on the monitor it shows as Screen 1 in the sharing dialog. Often this is the monitor it last used for the controls. I suspect Screen 1 may be the first monitor it detects when it starts, which would likely be your laptop screen. So in most cases you should not have any issues and the meeting control bar will be on your laptop screen while the ghost monitor is shared.
If for some reason the controls do not appear on your laptop screen after you share the screen, they are likely on the ghost monitor. The question is how to access them so you can stop sharing. It is good to know some of the Zoom shortcut keys. Press Ctrl+Alt+Shift will move the focus to the Zoom control bar. Alt+S will stop sharing the screen and return to the Zoom meeting window.
If this happens, I suggest you unplug the virtual display emulator plug and share the screen or a window in Zoom. The controls will be on your laptop screen because there is no ghost monitor. Use your mouse to grab the green part of the controls that drop down from the top of the screen and move the control bar slightly left or right. This seems to tell Zoom which screen the controls should appear on.
Then try plugging in the virtual display emulator plug and try sharing the ghost monitor. Hopefully it will now show the controls on the laptop screen.
Moving an app window from the ghost monitor
You can share more content than just PowerPoint slides, including websites or other apps like Excel or Word. If one of these apps accidentally opens on the ghost monitor, how can you move it back to the laptop screen? Hover over the app in the Windows taskbar. The open windows for this app will appear. Right-click on the window you want to move to display a menu of options. Click on the Move option.

Use the left arrow key to move the window from the ghost monitor that Windows thinks is to the right of the laptop screen on to the laptop screen. If Windows thinks the ghost monitor is on the left of the laptop screen you would use the right arrow key. Check the arrangement of monitors in the Windows Display settings if you are unsure of how the monitors are arranged.
Why I think this may be the best solution to add a second screen for those with just a laptop screen
Here’s why I think this is the best solution so far:
- This is the cheapest solution since the virtual display emulator plug costs about $10
- It is a hardware solution that does not require any drivers to be installed so it is likely to be highly compatible with locked down corporate laptops
- The plug is very small and takes up less space than the other hardware solution I published
- Because your laptop thinks it has a second monitor, you can use all of the features of Presenter View when presenting without having to remember to pause and resume your screen sharing
- The ghost monitor allows you to share a higher resolution version of your slides than sharing a portion of your screen, especially if you do not have a high-res laptop screen
If you want to try out this solution, use the links in the article above to get your virtual display emulator plug and test this out in Zoom.
Video
The video below shows this technique using the Teams meeting platform (Zoom works the same way and just has a different sharing dialog).

Dave Paradi has over twenty-two years of experience delivering customized training workshops to help business professionals improve their presentations. He has written ten books and over 600 articles on the topic of effective presentations and his ideas have appeared in publications around the world. His focus is on helping corporate professionals visually communicate the messages in their data so they don’t overwhelm and confuse executives. Dave is one of fewer than ten people in North America recognized by Microsoft with the Most Valuable Professional Award for his contributions to the Excel, PowerPoint, and Teams communities. His articles and videos on virtual presenting have been viewed over 4.8 million times and liked over 17,000 times on YouTube.