As more business professionals return to the office, hybrid meetings will become the norm. A hybrid meeting has some participants in the meeting room and some attending virtually from home or other locations.
Most meeting rooms won’t have a full room system
The ideal setup is a full meeting room system that includes a screen, multiple cameras and sound system that integrate with the meeting platform. These systems are expensive and many (maybe most) meeting rooms will continue to only have the screen at one end of the room. What can you do to make this setup effective for your hybrid meeting? Bring your own meeting room system.
You don’t need fancy equipment to do this. You just need a webcam and a Bluetooth or USB speaker. Items that you can buy and carry easily and don’t require a lot of setup. In this article I will explain how to set up the equipment and use it as a room system in a hybrid meeting.
Choosing a webcam
I suggest you use a webcam, like the one many people bought when they were working at home. A 1080p resolution will usually give a good image to everyone in the meeting. Because webcams easily connect to your laptop, they are easy to set up. Many also offer different options for positioning them, such as standing on a table, hung on the top of a screen, or mounted on a tripod.
Different webcams have different viewing angles. This wasn’t as important at home with the webcam 12-18 inches from us, but when you want the camera to show everyone in the room, the viewing angle is more important.
The larger the viewing angle, the more horizontal view will be shown. There are two common viewing angles used in webcams, 78 degrees and 90 degrees. The wider viewing angle usually is found on more expensive cameras. Some common webcams that use the 78 degree viewing angle lens include the Logitech C920, C920S, C922, and C925e and the Microsoft Modern webcam. The Logitech Brio and C930 use a lens with a 90 degree viewing angle. The Anker PowerConf C300 webcam offers an adjustable lens that can show 78, 90, or 115 degrees.
In the section on positioning the camera below I’ll share how much of the room the camera will see based on the viewing angle and how far it is away from you.
A Wyze security camera as a webcam
One option for a wider viewing angle lens is to use a Wyze security camera. Like most security cameras, it has a wider viewing angle lens so you can see more of what is going on. Also like many wider lenses it slightly curves the image at the edges. The Wyze security camera has a 110 degree viewing angle lens. This allows more of the room to be seen by the virtual attendees.
The Wyze security camera software needs to be modified in order to make it act as a webcam. It is the only security camera I am aware of that offers this option. Wyze explains how to do it on this page. Note that you will need a male-to-male USB-A cable to connect the Wyze to your laptop, which is not a common cable so you will likely have to purchase it.
Positioning the webcam
In a typical meeting room with the screen at a short end of the room, it is best to position the webcam above or below the screen. Every room is different, so you will have to figure out which position works best. Other options include on the table in front of the screen or higher in the room but off to one side of the screen depending on the room setup.
If you are using a tripod to hold the webcam, make sure you have enough space for it and it can position the webcam high enough that everyone in the room is visible. I tend to prefer a selfie stick tripod because it has a small footprint on the floor or table and is small to carry. Here’s the one I use.
Because the screen may be further away from the table than the webcam cord will reach, consider getting a USB extension cord to give more space between the webcam and the laptop if you are positioning in at the screen. I suggest a 10 foot cord like this one.
How far the webcam should be from you
As I explained above the different viewing angles of webcams allow more or less of a view in each horizontal direction. To understand how far to position the camera away from you and other in-room attendees, I’ve created the table below that shows the distance in inches on each side of the center of the image that webcams of different viewing angles will show when placed different distances away from you. Here’s an illustration of the setup.
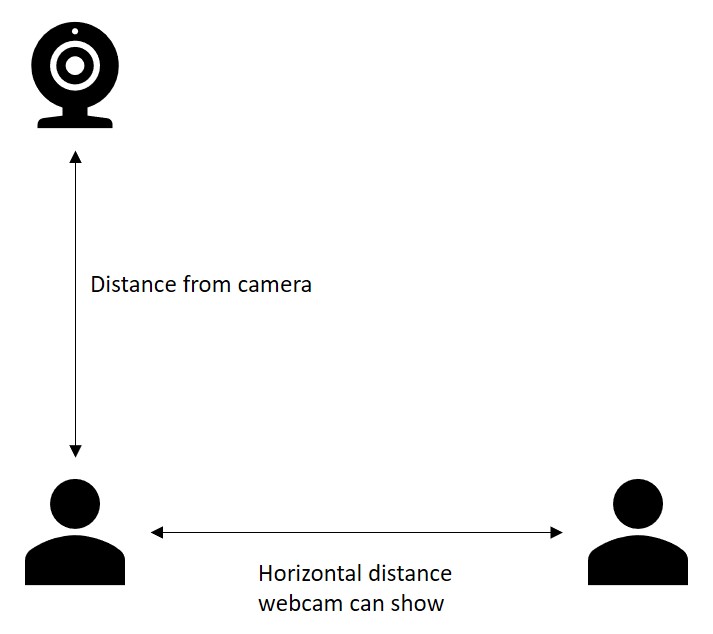
Table of how far (in inches) on each side of the presenter the webcam will show based on distance and webcam viewing angle
|
Distance from camera (inches) |
Viewing angle of webcam lens |
||
|
78 |
90 |
110 |
|
|
24 |
19 |
24 |
34 |
|
30 |
24 |
30 |
43 |
|
36 |
29 |
36 |
51 |
|
42 |
34 |
42 |
60 |
|
48 |
39 |
48 |
69 |
|
60 |
49 |
60 |
86 |
|
72 |
58 |
72 |
103 |
To use the table above, start by finding out what the viewing angle is of your webcam. Let’s take 78 degrees as an example because it is the most common lens in webcams. If the webcam is across the table from you, it is likely about 36 inches away. In the above table, go down the 78 degree column to the 36 inch distance row and we find that the camera will show 29 inches to each side of you. This is not very far. By using a 110 degree angle camera, the remote attendees would see 51 inches on each side of you.
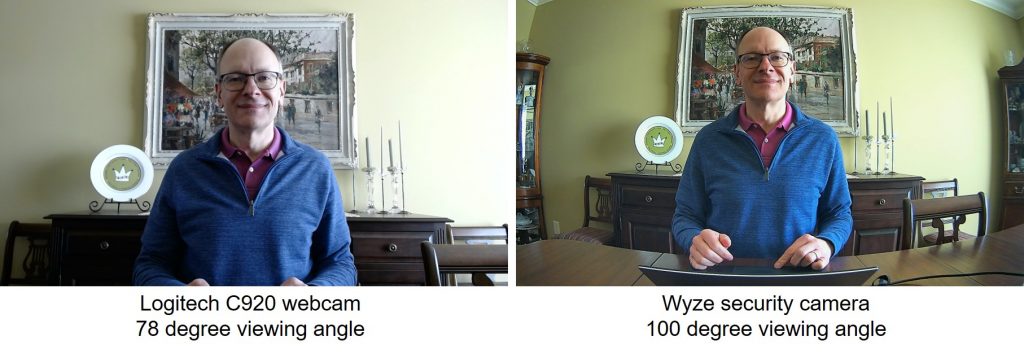
Here’s an example of what the difference is in our dining room. I am approximately 36 inches away from the webcam in each photo.
If the room is setup so the screen is at the short end and the webcam is above or below the screen, it should be fairly easy to see everyone in the view of the webcam since it will be quite a distance from you and room is longer than it is wide. If it is a small meeting room with the screen on the long end or the webcam is on the table where you are sitting it will be harder to see people spaced apart and a wider viewing angle webcam may be more helpful in order to see everyone.
Use a Bluetooth or USB speaker with mic as the room sound system
In addition to seeing everyone in the room, you want the remote attendees to hear everyone when they speak and you want the people in the room to hear what is said by each remote attendee. Here are two options to consider.
Option A: Use a speakerphone device
Anker makes the PowerConf S3 Bluetooth Speakerphone that has six mics to pick up in all directions, background noise reduction, is optimized for voices and is battery powered. It can connect via Bluetooth or USB-C cable giving you more connection options.
Microsoft and other manufacturers offer speaker devices that are built for meetings. They are not primarily for playing music so the speakers and mic are better at picking up and playing spoken audio. Microsoft’s Modern USB-C speaker announced in spring 2021 has dual noise-reducing microphones, a mute button, and is optimized for voices. It does require a USB-C connection to your laptop and does not offer a Bluetooth option.
Option B: Use a Bluetooth speaker that has a mic
Bluetooth portable speakers have been around for a long time and most are used to play music in a large room for a gathering or party. The difference in this usage is that you need the device to also have a microphone that will pick up people speaking who are not right in front of the device but may be six to ten feet away.
When you look at these devices, make sure it has a microphone. It may be listed as the ability to do phone calls in the feature list. Not all mics will pick up voices at a distance so you may have to check reviews or conduct some tests yourself.
An option you should not consider is having the mic and speakers from two separate devices, such as the webcam mic with a Bluetooth speaker. This can cause feedback issues and should be avoided.
If your device connects via a USB-C cord and your laptop does not have a USB-C port or does not have one that is open, you can either use a USB-C hub to add more ports or use a Bluetooth device which does not require a port.
Positioning the speaker device
Usually the best place for the speaker device is the center of the table in the meeting room in front of the presenter because they will be speaking the most. If the device requires a USB-C connection, you may need a longer cord than the one that comes with the device depending on where you are sitting at the table. This 10 foot USB-C cord should give you more options.
If the device needs power or the battery is low, you will also need to plug it in to a power outlet. Most USB-C devices will draw power from the laptop so make sure the laptop is plugged in or charged enough to also power the speaker.
Connecting the devices in the meeting room
When you get into the meeting room, connect your laptop to the screen in the room as you normally would. Then connect the webcam and speaker to your laptop. The webcam usually connects via a USB-A or USB-C port. The speaker may use a USB-C port or may connect via Bluetooth. Connect your laptop to a power outlet and connect the speaker to power if required. Position the devices as discussed above, using a tripod for the webcam if needed.
While this sounds like a lot initially, it will become easier and quicker as you use the setup more. Practice setting it up in your own office or at home before to become comfortable with the setup.
Selecting the devices in a meeting
All of the major meeting platforms allow you to select the camera, microphone, and speakers you want to use in the meeting. Go to the settings for the devices in the meeting platform app and select the ones you have set up. Test them with an attendee to confirm they are working.
Using the webcam in a meeting
Using a webcam as a room camera will require you to play the role of video director as well. You will have to think about what is being projected on the screen in the room as well as what the remote attendees see.
Become comfortable with the Pin and Spotlight features of the meeting platform. Pinning allows you to make one (or more) video feeds large on the screen in the meeting room. This would be used when you want the people in the meeting room to focus on one speaker instead of the usual grid of videos.
Spotlighting is when you make one (or more) video feeds large on everyone’s screen. You would use this to highlight a speaker to everyone in the meeting. Because your webcam is showing the whole room, you can also use this to show the full room large to all the remote attendees during a discussion.
Sharing content such as a PowerPoint presentation usually overrides pinning or spotlighting. The major meeting platforms like Zoom and Teams will be introducing more ways to have a speaker’s video larger while sharing content such as slides. Keep up with the new features in the meeting platforms you regularly use so that you can take advantage of the features as they are available.
Be aware of the webcam and mic position
If you are presenting using this room meeting system you will have to be more aware of looking at the webcam as well as the people in the room so that you include the remote attendees. You will also have to be conscious of directing your voice to the mic on the table as well as the people in the room. These are changes from how we presented in a room full of people in the past and how we present when we are at home. This article gives six ways presenting in a hybrid meeting is different than before.
Having your own meeting room system gives you flexibility
By using a webcam and portable speaker you can set up a meeting room system in any meeting room. This gives you more flexibility in what room you book for meetings and where you decide to meet. As long as the room has a screen, you can turn it into a room that better supports hybrid meetings.
Solutions to consider
Combine a Logitech webcam with the Poly Sync 60 audio device

Dave Paradi has over twenty-two years of experience delivering customized training workshops to help business professionals improve their presentations. He has written ten books and over 600 articles on the topic of effective presentations and his ideas have appeared in publications around the world. His focus is on helping corporate professionals visually communicate the messages in their data so they don’t overwhelm and confuse executives. Dave is one of fewer than ten people in North America recognized by Microsoft with the Most Valuable Professional Award for his contributions to the Excel, PowerPoint, and Teams communities. His articles and videos on virtual presenting have been viewed over 4.8 million times and liked over 17,000 times on YouTube.