As more conference rooms move from using projectors to using monitors to display presentations, an issue is coming up in larger rooms. While a single large monitor will work in a small to medium sized room, it is too small for a medium to large sized room. To create a larger display, organizations install a video wall, typically consisting of a rectangle with four or nine monitors.
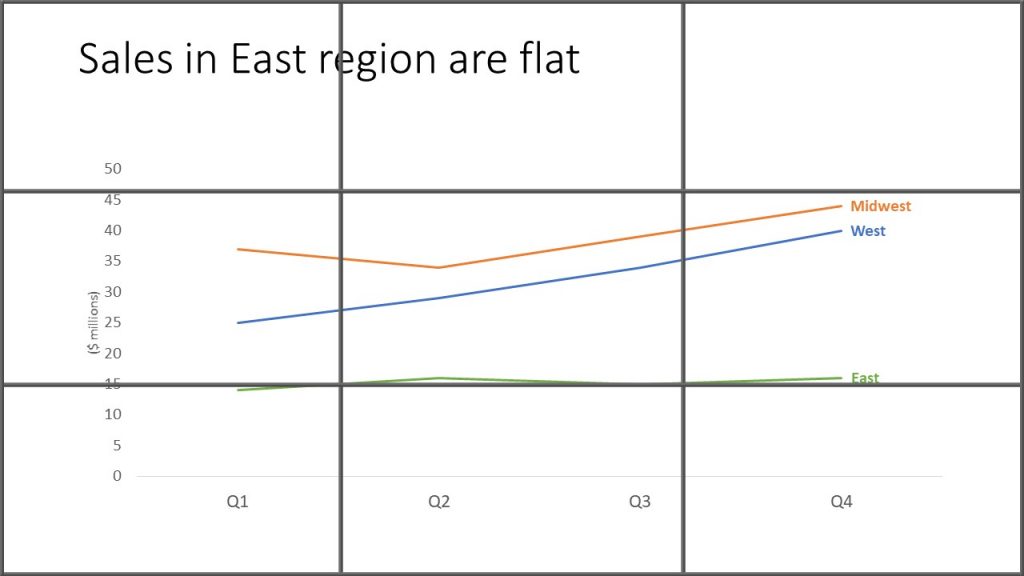
While this creates a large enough display, it creates an issue for presenters. The monitors have bezels and even thin bezels will create horizontal and vertical lines in the display. Whatever content is on this part of the slide is lost due to the bezels. If that happens to be a line on a graph or an important word in the conclusion of analysis, the audience will not see it. Here is an example of what can happen.
How can you test to make sure that important slide content will not be lost if you are using a video wall of monitors? You can use the guides feature in PowerPoint. When you add guides in PowerPoint, they appear on every slide in editing mode only. The original purpose is to help designers visually organize content. But we can use guides to test if any content will be hidden by the bezels of a video wall.
Here are the instructions to add guides for a 3×3 video wall (adjust the number of guides depending on the number of monitors in the wall).
- Add a new blank slide to your file using the Blank layout that has no placeholders.
- Draw two straight horizontal lines that span the entire width of the slide.
- Draw two straight vertical lines that span the entire height of the slide.
- Using the Align tool, distribute the horizontal lines evenly between the top and bottom edges of the slide.
- Using the Align tool, distribute the vertical lines evenly between the left and right edges of the slide.
- Right click on the slide and in the Grid and Guides sub-menu add two vertical and two horizontal guides.
- Drag the guides so they are on top of the lines you drew earlier.
Once the guides are displayed, you can review each slide and check that none of the important content lies underneath one of the dashed guide lines. If it does, move the content slightly so that it is not under the guide line. This way you can increase the probability that the audience will be able to easily see all of your important content.
This video shows you the steps above to add the guides and review your slide content.
Using guides is a better approach than adding temporary lines to the slide master as too many presentations contain multiple slide masters. This article explains how you can properly start a new presentation file from your corporate template so that you only have one slide master.
If your organization or the rooms you present in are switching to video walls, use the guides to check the position of the important content of your slides.

Dave Paradi has over twenty-two years of experience delivering customized training workshops to help business professionals improve their presentations. He has written ten books and over 600 articles on the topic of effective presentations and his ideas have appeared in publications around the world. His focus is on helping corporate professionals visually communicate the messages in their data so they don’t overwhelm and confuse executives. Dave is one of fewer than ten people in North America recognized by Microsoft with the Most Valuable Professional Award for his contributions to the Excel, PowerPoint, and Teams communities. His articles and videos on virtual presenting have been viewed over 4.8 million times and liked over 17,000 times on YouTube.