Many professors and lecturers are moving to a flipped classroom style approach for virtual classes. In this approach, the instructor records a video of their lecture, the students watch the video, and the class time is used to discuss what was shared.
Many instructors are having to create videos of their lectures for the first time. If you are in this situation, this article will give you some tips as you move from lectures in a classroom to lectures online and explain how you can create a recording of your lecture with your voice narrating your slides.
If you’ve been told that you need new equipment and software and you have to learn it in order to create a video lecture, that is just not true. You can create a video of your lecture using the same PowerPoint that you used to create the slides for class.
Tips to make your video lecture more engaging for the students
Break your lecture into separate topics
A video more than 30 minutes long will be too much for most students. Break your lecture into topics that are a maximum of 20-30 minutes long. People can pay attention to shorter videos much better. They can also fit in watching a shorter video between their other tasks or on their commute. Look at your lecture and see where the natural breaks are based on the major topics you discuss. Make each topic a separate video.
Add section divider slides
Within any topic video, further break down the material into the sections that make up that topic. Before you start discussing that section, add a section divider slide. This slide should have a background color and large text with the section name. These slides should stand out in appearance from the other slides you are using. When students scan through the video looking for a specific section to review, these divider slides are easy for them to find. It makes your video more useful to them.
Use polls to test knowledge
Before or after a section, consider using a poll to test the students’ knowledge. Create a slide that has a multiple choice question on it with the correct answer and other answers that make the student think about which answer is correct. Ask the students to pause the video and decide on which answer they think is correct. Then discuss each of the answers, explaining why it is incorrect or correct. This is a good review at the end of a section or a good introduction to a section.
Use statements to encourage reflection
When you want the students to consider different perspectives, create a slide with a statement and ask the students whether they agree or disagree with the statement. Ask them to pause the video and take a few minutes to reflect before deciding. When they restart the video you discuss each side of the issue so that they can learn more about the different perspectives.
Use questions to discover misconceptions
If there is a common belief that is not true, create a slide with a question or statement that would likely lead most people to answer incorrectly due to the common misconception. Ask the students to pause the video briefly to answer the question or respond to the statement. After they restart the video you can explain how the common answer is incorrect and what the correct answer is. By offering the contrast between a common thought and the truth, it can help lock in the learning.
Be deliberate with your language
When you want the students to look at the slide, make sure you ask them to “look” at it or “watch” it. By being deliberate about the instruction, you will be able to get the students to pay attention to what is on the slide in case they are distracted by something else. Obviously you can’t use this for every slide or every point on a slide or else they will tune it out. Decide on the key visuals you want them to pay attention to and be deliberate about drawing their attention to the slide sat that time.
Tips to create a better recording
Make sure your font is big enough
Many students will be viewing your slides on devices that have screens much smaller than a classroom screen. It could be a tablet or a phone. You need to make sure the font you use for text is big enough to see. If you want to test what different font sizes look like on your phone or tablet, open the camera app on your device. Aim the camera at the QR code below. Tap on the message to open the web page on your device.
On the web page, play the video. This 30 second video created from a PowerPoint slide demonstrates what different font sizes in PowerPoint will look like on a mobile device. Even in landscape mode, the smaller font sizes are too small to easily see. I suggest a minimum of 18-20 point text with a suggested size of 24-28 point text. This may require you to split some text heavy slides into multiple slides but at least the students will be able to read the text.
Use an external microphone
In order to get better sound on the video, use an external microphone when recording the narration. This doesn’t mean you have to buy a new device. Just connect the earbuds that came with your phone to your computer. They have a mic that will be closer to your mouth when recording and it will pick up less background noise.
Minimize distractions when recording
Do your best to eliminate or minimize distractions or noises that will impact the quality of the recording. Close any doors and ask others to refrain from noise when you are recording. Use Focus Assist in Windows 10 to stop notifications popping up on your screen during the recording. Close all other apps and programs, even ones that are hidden in the taskbar notification area. If you feel it necessary, disconnect your computer from the Internet (don’t do this if you store files in a cloud storage location like OneDrive, SharePoint, Dropbox, Box, or iCloud as this may cause errors saving your file).
Export the video at 1280 x 720 resolution
The default for many high-res systems is to export or save the video at an HD resolution of 1920 x 1080. I suggest you export at a lower resolution of 1280 x 720. The resulting file will be much smaller without any noticeable loss in visual quality. The smaller file will use less bandwidth for those students who are watching the video on a mobile device. The smaller file will also load quicker for all students, regardless of what connection they have.
Record narration in PowerPoint
PowerPoint offers a built-in method for creating a video from your slides. You can use the Record Slide Show function of PowerPoint to add audio (or video) to each slide in your presentation. You can see the steps in this article from Microsoft.
If you don’t see the Record Slide Show function on your ribbon, follow the steps in the article to add that function to the ribbon. Make sure you have the correct microphone selected as the default microphone in the Windows sound settings.
This method adds a media object to each slide and adds transition timing to the slide. You will see the audio object icon on the slide after the recording is finished. You can also see the timing in the Transitions ribbon.
This method offers an option to record the webcam as well as the audio. This requires you to have a webcam on your device and set as the default webcam in Windows.
If this method will work for you, you can create a video from the PowerPoint file that has the narrations added. This article from Microsoft explains how to create the video file. According to the article, this method will take any embedded video files and include them in the video of the presentation. If the video is a linked file, like a linked YouTube video, the YouTube video will not be included in the file PowerPoint produces (you will be warned if this is the case and be given the option to cancel the export).
When you are exporting the video, you can choose the quality level of the video file. As I suggested above, I recommend you select the 1280 x 720 resolution for the video file.
(For detailed instructions on this method and a video tutorial, check out my online course below)
Potential issues with this method
The audio narration is added as an audio object to each slide. To do this, PowerPoint pauses the recording of the audio when you move from one slide to the next. If you are speaking during the transition, those words will not be captured or only parts of them will be captured and possibly on the wrong slide. You will have to get used to pausing when you want to advance to the next slide.
There is no easy way to edit the audio object once it is on the slide. So if you make a mistake, you will have to record the audio for that slide again.
Since this method adds an audio object to each slide, if you use the slides in another setting, the audio will play and the slides will advance based on the timing set when you did the recording. This may not be ideal. And if you copy a slide to another presentation, the narration and timing is copied as well, which could lead to a surprise when you present.
If you choose to use the webcam recording method, PowerPoint puts the webcam video on top of the lower right corner of the slides. This covers up any content that is in that area, which may be a problem. You can move the video object after it is on the slide but unless you have designed your slides to have a blank area big enough for the video, it may be hard to find a suitable location. You also don’t want to have the video appearing in different places on each slide as that is very distracting for the students.
If you want to include a separate video clip in the recording, you must embed it into the PowerPoint file, which could make the PowerPoint file huge and unable to be emailed. If you want to keep the video clips as links (to either online videos or to local files) to keep the PowerPoint file small, the export of your slides to video will not include the clips.
Conclusion
If you need to create recorded lectures as you move to a flipped classroom approach, you don’t need any new software or hardware. You can use the features of PowerPoint to create a narrated video of your slides. Take some time to think through what changes you should make in order to keep the students engaged during the video.
Other options
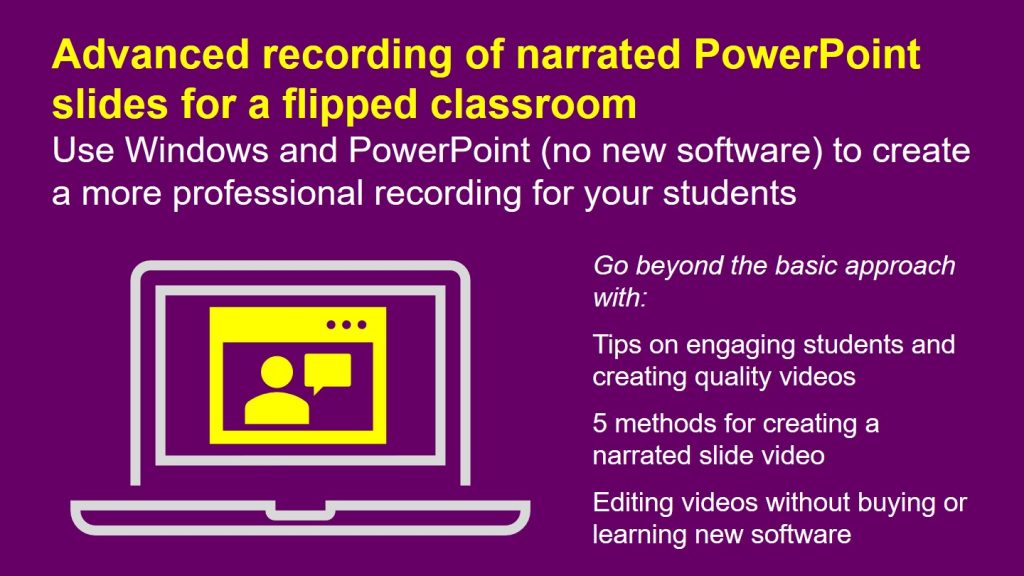
I am now offering a course called Advanced recording of narrated PowerPoint slides for a flipped classroom: Use Windows and PowerPoint (no new software) to create a more professional recording for your students. These written tutorials and accompanying videos show detailed instructions for the above method and four other options for creating a recording of your PowerPoint slides. These methods overcome the potential issues in the method above and provide a more professional video. You will also learn advanced tips to make your video even more engaging for the students. You can get access to the right now for an introductory price. Click here to register.

Dave Paradi has over twenty-two years of experience delivering customized training workshops to help business professionals improve their presentations. He has written ten books and over 600 articles on the topic of effective presentations and his ideas have appeared in publications around the world. His focus is on helping corporate professionals visually communicate the messages in their data so they don’t overwhelm and confuse executives. Dave is one of fewer than ten people in North America recognized by Microsoft with the Most Valuable Professional Award for his contributions to the Excel, PowerPoint, and Teams communities. His articles and videos on virtual presenting have been viewed over 4.8 million times and liked over 17,000 times on YouTube.