As I say in my customized workshops and I have said before, I believe that text slides continue to play an important role in business presentations. Not the text slides that are paragraphs that the presenter reads to the audience, but key text phrases that give your audience context for what you are saying. In August last year I wrote about why you should ignore the advice from some designers to remove all text from your presentation. When you use text, especially bullet points, you need to make sure the formatting is correct so you do not distract your audience with poor design. This is an example of the formatting I see too often.
How did this happen? Why aren’t the bullets using the proper hanging indent format? And how can you fix this if it happens to you?
There are a number of different causes for poor bullet point formatting. Some organizations have poorly constructed templates. The settings may work in certain situations, but once you start changing a couple of settings, you start to see this type of text formatting. If you run into this regularly, it may be that your organization’s template needs to be fixed (consult this book if you need help creating a template).
Sometimes this is caused by the default text box formatting set by someone else. If you have started by using a file from someone else, you may have the default settings for the shapes in that file. I see this in files I get from clients where the default settings for each shape have been set to odd combinations and it creates a lot of manual work to fix the formatting. To set the default settings for all future text boxes, format the text box to what you want, then right click on the border of the text box and select Set as Default Text Box.
So what settings control the format of text box indents? It isn’t obvious in the default setup of PowerPoint. Most versions of PowerPoint do not come with the ruler turned on, so you don’t see the settings that control the hanging indent. Yes, you can access these settings in a dialog box, but that involves calculating measurements when it is much easier to adjust the settings by sliding them on the ruler.
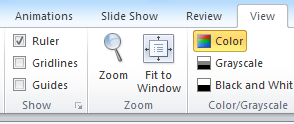
To turn on the ruler, check the Ruler checkbox on the View ribbon.
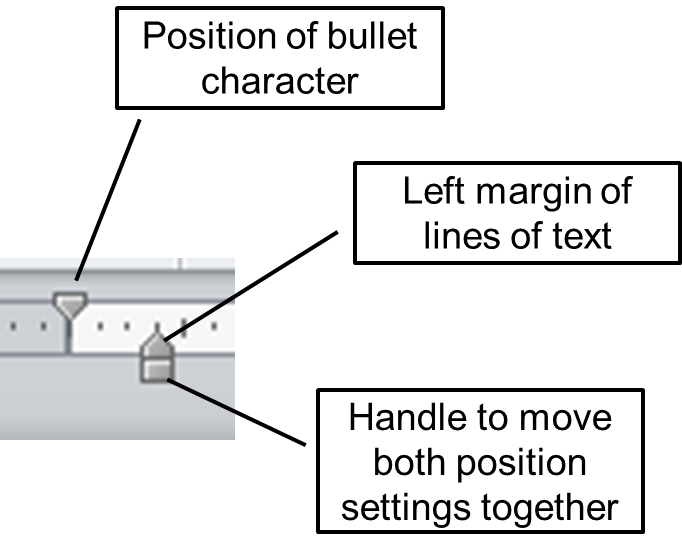
Once the ruler is turned on, you will see the ruler at the top of the slide when you are editing a text box, table cell or the text in a shape. To format bullet point indents using the ruler, drag the three indent setting shapes to format the bullets the way you want.
In the slide shown at the start of the article, the ruler looks like this.
Properly set indents should look like the previous ruler image. First select all the text in the text box. You need to do this because PowerPoint allows different formatting for each paragraph in a text box. To change the setting in this example, drag the rectangle to the right to move all the text to the right. Then drag the top pentagon to the left to move the bullet to the left so it is a proper handing indent. This is what the slide looks like after fixing the bullet formatting.
There is no problem using text in bullet points on your slides. Use the tips in this article to make sure that text is properly formatted in hanging indents.

Dave Paradi has over twenty-two years of experience delivering customized training workshops to help business professionals improve their presentations. He has written ten books and over 600 articles on the topic of effective presentations and his ideas have appeared in publications around the world. His focus is on helping corporate professionals visually communicate the messages in their data so they don’t overwhelm and confuse executives. Dave is one of fewer than ten people in North America recognized by Microsoft with the Most Valuable Professional Award for his contributions to the Excel, PowerPoint, and Teams communities. His articles and videos on virtual presenting have been viewed over 4.8 million times and liked over 17,000 times on YouTube.


