Collaborating in PowerPoint
If you need a group to brainstorm and analyze ideas or organize tasks, if you need a group to collaborate to come up with an agreed upon process flow, the common approach in the past has been to get everyone involved in a room and work together. You need everyone to see each other’s work and be able to contribute.
When you are working virtually or in a hybrid situation where some are in a room and some are remote, you still need the collaboration and participation from everyone. The skill of collaborating during virtual or hybrid meetings will continue to be important in the future as the way we work has changed to be more flexible.
Collaborating using a shared PowerPoint file is a good solution that is easy for everyone to use. They can participate through a browser so it is available no matter what computer or device they have. It works on any meeting platform because it is independent of the platform. It uses a common tool that everyone is familiar with. And it happens in real time, making the collaboration more effective.
This solution has advantages over other tools or solutions. The output of online whiteboard collaboration is often difficult to use because it is often not saved as text or objects that can be easily copied to other apps. Independent web-based tools require everyone to have an account to use all the features and involve everyone learning the tool in order to fully participate. Tools that are built into one platform can’t be used if the group uses a different meeting platform.
Make sure everyone will be able to edit the file
Before you collaborate in PowerPoint, you need to make sure everyone will be able to edit the file so they can contribute.
If you are working in a more personal setting, you can save the file in your personal OneDrive and the default is that you can allow editing of shared files.
In a corporate setting you will likely use SharePoint or OneDrive for Business. If all of the participants are from the same organization, the usual default allows for editing of files that are shared. If you are including participants from outside the organization, your SharePoint administrator will need to allow two permission levels. First, they need to allow file access permission to so that Anyone links can be accessed without requiring sign-in. Second, in the Sharing Policies section of the SharePoint Admin center they need to set the file permission for Anyone links to View and edit (the default is view only). If this seems a little technical, check with your IT support staff to make sure Anyone links can be edited by people outside the organization without requiring sign-in.
It will work best if everyone who accesses the file is signed into their Microsoft account. This is not usually an issue in organizations because that is how most access is done these days. For those outside the organization signing in makes sure everyone can see who is editing which object. Signing in using a personal Microsoft account works as well as a work or school account for this purpose. If someone is not signed in they show up as GC – Guest Contributor and it is harder to know who is working on what object.
Create the file & set the slide size
It is best to create the PowerPoint file in advance so you can ensure it is set up properly.
The first decision you need to make is what slide size you will use. Because we are not actually creating slides we don’t need to be bound by the usual slide sizes that PowerPoint uses. If you are brainstorming ideas or tasks, perhaps a letter or legal paper slide size and portrait orientation will be best. If you are diagramming as you would on a whiteboard or large piece of paper, perhaps a 36 inch tall by 56 inch long slide size in landscape orientation will work. The maximum slide size is 56 inches in either direction. On the Design ribbon in the Slide Size section, select to use a Custom slide size.
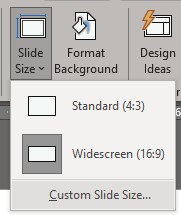
In the dialog box use the Custom setting to set the slide size.
Save the file in OneDrive or Sharepoint.
Add instructions and standard objects
On the first slide, add instructions for people as to how the file is arranged and how they should use the file. It is best to have this in the file so during the work they can refer to the instructions without having to remember what was initially said or interrupt the flow by asking.
If you are brainstorming ideas, you might set up one slide for each person to do individual brainstorming first. Have one or more text boxes on the slide set up for them to start adding ideas or tasks. When it comes time to integrate the ideas or organize the tasks, there can be another slide that brings all the work together.
If you are diagramming on a large slide size it is best to add the common objects that people will use, such as shapes and lines, and position them in the top left corner of the slide. This makes it easier when working on a large slide size in PowerPoint on the web. On the web, any new objects added by inserting a shape are placed in the middle of the slide, making people zoom out, find the middle, zoom in, select the object, cut it, zoom out, zoom in to the correct location, and paste it. A lot of work. By having existing objects, the copy and paste of an existing object places the new object beside the first object, making it easier to simply move the new object into position. This will save time and make the process much less frustrating.
Share the link to the file
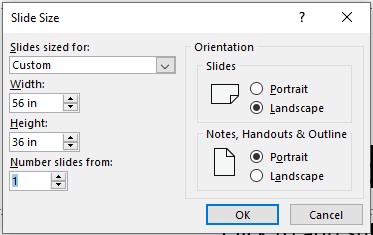
Once you have created and saved the file, you can get a link in PowerPoint to share the file. In the top right of the PowerPoint window look for the Share button.
![]()
Click on it and you will open the sharing dialog.

By default the link only allows viewing. Click on the “Anyone with the link can view” button to open the Link settings dialog.

Check the box to Allow editing and click on the Apply button. You now return to the Send link dialog.
On the Send link dialog, click on the Copy link button at the bottom. This will generate a link and copy it to your clipboard.
Now you can paste the link into an email if you want to send the link in advance or you can copy the link into the meeting platform chat to share it with everyone during the meeting. Once done you can close this dialog.
The default when someone clicks on the link is that the file will open in PowerPoint on the web. This allows people to participate regardless of what computer or device they are using. Using the web version of PowerPoint is encouraged as the actions of everyone will show up immediately and the web version has all the capabilities you need.
See who is editing what object
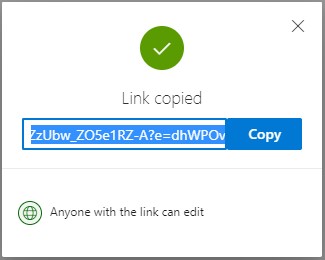
When multiple people are editing a file you will see their initials in the top bar of PowerPoint beside the Share button. Each person will be assigned a different color.
![]()
When they select a slide to work on, the slide will show their initials in the top right corner.
When they select an object on a slide, the object will have a border in their color and their initials will appear in the top right of the object.

This identification of which slide someone is on and what object they have selected makes the experience and discussion richer.
Tips for navigating large slides
By default when a PowerPoint file opens in the web version it displays the full slide. This is an issue when using a large slide size like you would for diagramming or process mapping. The objects appear tiny on the slide.

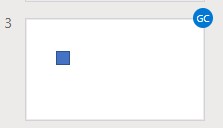
In the bottom right corner of the PowerPoint window are the zoom controls.
![]()
You can see in this example that the zoom level is 19% because it is fitting a 36 inch by 56 inch slide into the browser window. If you click on the zoom level (19% in the screen capture above) you display the zoom dialog.
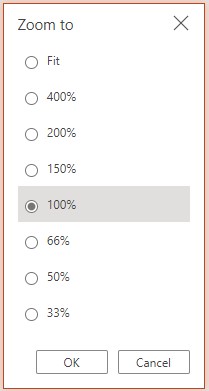
The default level is Fit. I suggest you select 100% so you can see the objects at a reasonable size. PowerPoint zooms in on the center of the slide so you will need to use the vertical and horizontal scroll bars to move to the portion of the slide you want to see.
An advanced tip is to select an object on the slide before you change the zoom level. When an object is selected, PowerPoints zooms in on that area and you don’t have to use the scroll bars to go the area of the slide you want.
You can click on the Zoom to Fit button to the right of the zoom level percentage to return to a view of the entire slide when needed.
All work is automatically saved
Because the file is on OneDrive or SharePoint and everyone is working on the web, all changes are saved immediately. No one has to remember to save the file regularly. When the meeting is over, everyone closes the browser tab or window with the PowerPoint file and the file is ready for reference by others.
Leverage collaboration in PowerPoint on the web
Collaborating is an important part of work. Use the capabilities of PowerPoint to collaborate with others virtually regardless of what computer they are using and on whatever meeting platform you use.
Video of collaborating in PowerPoint on the web
Below is a video showing an example of the steps in this article to collaborate on a PowerPoint file in a Teams meeting.
Where to go next
–>More articles on virtual presenting –>Training for your team on presenting virtually
–>More articles on virtual & hybrid sales presentations –>Training for your sales team

Dave Paradi has over twenty-two years of experience delivering customized training workshops to help business professionals improve their presentations. He has written ten books and over 600 articles on the topic of effective presentations and his ideas have appeared in publications around the world. His focus is on helping corporate professionals visually communicate the messages in their data so they don’t overwhelm and confuse executives. Dave is one of fewer than ten people in North America recognized by Microsoft with the Most Valuable Professional Award for his contributions to the Excel, PowerPoint, and Teams communities. His articles and videos on virtual presenting have been viewed over 4.8 million times and liked over 17,000 times on YouTube.