Microsoft announced in mid-July 2022 that annotating a shared screen is now available in Teams Public Preview and will be coming to all Teams tenants in the future. You can read more about how to turn on and use Teams annotations in their article here: https://support.microsoft.com/en-us/office/use-annotation-while-sharing-your-screen-in-teams-876ba527-7112-437e-b410-5aec7363c473.
Here’s an example of how it looks in action.
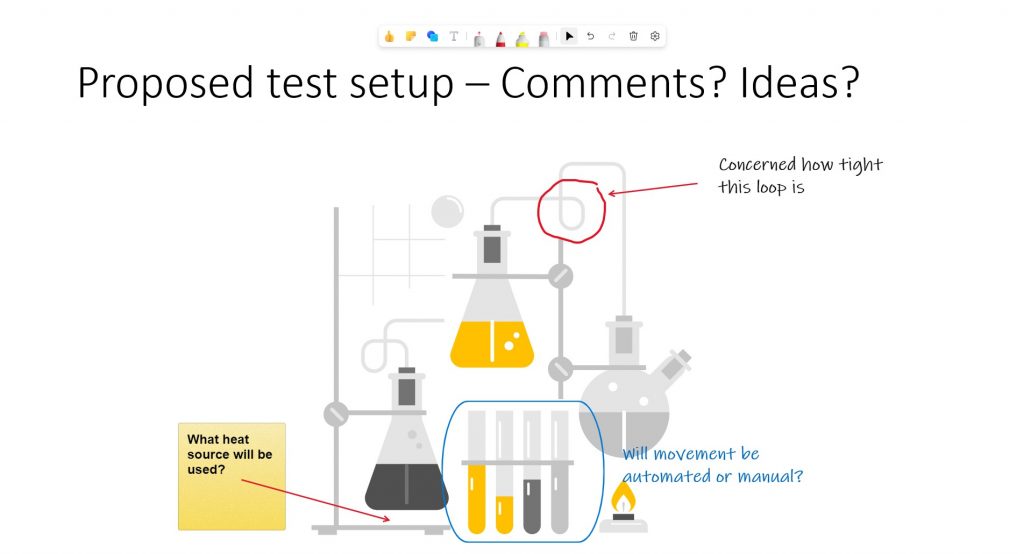
In testing the annotation feature, here are a few observations I’ve made.
Annotation only works when sharing a screen, not when sharing a window
The annotation feature only works when you are sharing a screen. If you try to turn it on when sharing a window it does not allow you to.
Annotations are like drawing on a window
Annotations in Teams are like drawing on a window. The annotations remain when what is underneath changes. So if you invite people to annotate a PowerPoint slide, the annotations will remain when you move to the next slide. This makes sense because the annotations are made on the screen and not on whatever app is being shown on the screen. So it is a good idea to use the trash can icon in the Annotation toolbar to delete the annotations before you move on.
People can draw on your video when you are using Presenter modes
I discovered this by accident when testing and it is something to be aware of. Annotations work when you are using one of Teams Presenter modes that allow your video to be beside your content. But participants can annotate even on top of your video. They can draw on top of your face or add derogatory text on your video and everyone in the meeting will see it. Everyone except you. The annotations are not shown in the Presenter mode preview window that Teams shows you. Just be aware of this.
The only way to capture an annotated screen is screen capture
The annotations aren’t saved in the meeting record or the app that is being displayed on the screen. Annotations are lost when the screen sharing is stopped. So if you want to save any annotations, take a screen capture. You can use Windows + Shift + S to capture any portion of the screen you are sharing. You can then save that image or paste it into an app.
Convert text annotations to editable text via OneNote
If you ask people to add sticky notes or text to a shared screen and want to convert that to editable text, OneNote might be able to help. Capture the screen and paste it into OneNote. Right-click on the image and select Copy Text from Picture. Then paste that text into OneNote or any other app. It won’t be perfect but it might save a lot of re-typing.
The font used for text annotations doesn’t appear to be able to be changed
The font used when adding text annotations looks like it was chosen to try to look like someone printing. It doesn’t appear that you can change this unfortunately. It doesn’t always get interpreted correctly by OneNote so words may not be spelled correctly. The lower case “t” seems to be an issue for One Note in particular.
You can copy text from other places and paste it into a text annotation
If you have text, like a phrase or definition, that you want to add, you can copy it from Word, a browser, or any other app and paste it into a text annotation.
Text annotations and sticky notes can only be resized proportionally
If you want to make a text annotation or sticky note wider, you can’t. Resizing only works from a corner and the text is also resized within the annotation. If you add text it makes the annotation taller but it does allow changes to the width of the annotation.
You can’t change the font size in a text annotation or sticky note
You can edit the text in a text annotation or sticky note but you can’t change the font size.
To stop annotating, press Escape or select the Select tool
Once you have added an annotation, you can press Escape to return your cursor to a normal cursor or select the Select tool in the annotation toolbar to stop using the tool you had been using.
The eraser works like a real eraser only on drawn annotations
To erase an annotation, use the eraser tool and drag it over ink or highlighter drawings. You have to drag it over all sections of the drawn item to erase it.
Remove reactions, shapes, sticky notes and text annotations, don’t use the eraser tool
The eraser does not work on reactions, shapes, sticky notes, or text annotations. To remove those items, select the item and use the trash can icon in the toolbar that appears.
Anyone can clear all annotations (but they can be restored with Undo)
The clear annotations trash can icon on the toolbar is available to anyone. This means that anyone in the meeting can erase all the annotations. This could happen by accident if they click on the trash can icon thinking they are only removing a single item. This means you may lose all the work that the group had done. If this happens, the person who deleted the annotations can use the Undo button in the toolbar to get everything back. Others can’t perform the Undo, only the person who cleared the annotations can restore them through Undo.
Shapes allow a fill color and border color
This allows shapes to be used as callouts around a section on the screen as shown by suing the oval tool in the image above.
Shapes drawn in ink can be converted to shapes
After you have drawn a shape using the pen, you can select the object and convert it to a shape using the button on the toolbar that appears.
All annotations can be copied and pasted
Once an annotation is selected, it can be copied using the usual Control+C shortcut key or the copy button in the toolbar that appears. It can then be pasted as a new annotation. It is pasted in a default location so you must move it to where you want it after pasting.
The text from a sticky note or text annotation can be selected and copied as text to another app
You can select a sticky note or text annotation and copy it with the Control+C shortcut key or the copy button on the toolbar that appears. You can then paste it in Word or any other app and it will paste in as normal text. This could be a good way to capture ideas that others added to a slide or document that was being displayed.
The laser pointer annotation does not stay on the screen after being shown
As expected, the laser pointer annotation tool does not stay on the screen. It displays as the laser pointer is being moved but no trail is left behind.

Dave Paradi has over twenty-two years of experience delivering customized training workshops to help business professionals improve their presentations. He has written ten books and over 600 articles on the topic of effective presentations and his ideas have appeared in publications around the world. His focus is on helping corporate professionals visually communicate the messages in their data so they don’t overwhelm and confuse executives. Dave is one of fewer than ten people in North America recognized by Microsoft with the Most Valuable Professional Award for his contributions to the Excel, PowerPoint, and Teams communities. His articles and videos on virtual presenting have been viewed over 4.8 million times and liked over 17,000 times on YouTube.