What can you do if you want to share a chart via email, Slack, or Teams but the chart doesn’t have all of the final data yet or you want others to know it contains confidential data? A good solution is to place a watermark behind the chart so everyone knows it is a draft or confidential chart. Unfortunately, Excel and PowerPoint do not have the same easy watermark feature that Word does. In this article I will show you how to create a custom watermark, add it to your chart, and easily remove it when you need to.
There are three steps in the process:
- Create the watermark in PowerPoint
- Save the watermark as an image
- Add the watermark image as the background of the chart
Create the watermark in PowerPoint
Most watermarks will be text that tells the viewer the restriction on the chart. In PowerPoint, create a new text box on a slide. Type the text that you want to use as the watermark. Examples include “Draft”, “Company Confidential”, or “Do not Distribute”. Make the font size larger, usually 32 point works well, and use a medium to dark grey as the font color. I suggest you rotate the text box 45 degrees counter-clockwise as that is common for watermarks (the easy way to rotate in 15 degree increments in PowerPoint is to hold the Shift key down before grabbing the rotation handle; each time you move the handle the text box will rotate 15 degrees, so three jumps will be 45 degrees). Here is what it could look like.

I’ve shown text as the watermark here but you can use any combination of text, images, or icons if you’d like. If you have multiple objects, group them into a single object before going to the next step.
Save the watermark as an image file
To use the watermark text as the chart background, you have to save this text box as an image file. Select the border of the text box and right-click. In the menu that appears, select the Save as Picture item. Enter the file name and select the file type. There are two file types to consider, each will give you a different result in the chart:
- Save as a PNG file: this file type will have a transparent background. When used as a watermark in the chart you will see whatever is behind the chart through the chart area because the area around the text will be transparent. In Excel you will see the gridlines from the worksheet through the chart which can be distracting.
- Save as a JPEG file: this file type will have a white background. When used as a watermark in the chart you will see the white background of the chart with the watermark between the white background and the chart elements. This is usually the option I suggest you choose.
Save the file to a location you can remember later on.
Add the watermark to the chart
Follow these steps to add the watermark to the chart.
- Click on the chart border to select the Chart Area and not any of the individual elements.
- Press Ctrl+1 to open the Format Chart Area task pane.
- In the Fill section of the Fill & Line group, select the Picture or texture fill radio button. The background may be filled with a strange texture but don’t worry, we will replace that next.
- Click the Insert… button under the Picture source heading. Use the file selection dialog box to select the file you saved in the previous step.
- By default it will stretch the watermark image to fit the size of the chart. I suggest you check the Tile picture as texture checkbox so that it creates a repeating pattern behind the chart.
- If the watermark stands out too much, use the Transparency slider to lighten the watermark by increasing the transparency.
Here’s what the task pane will look like.

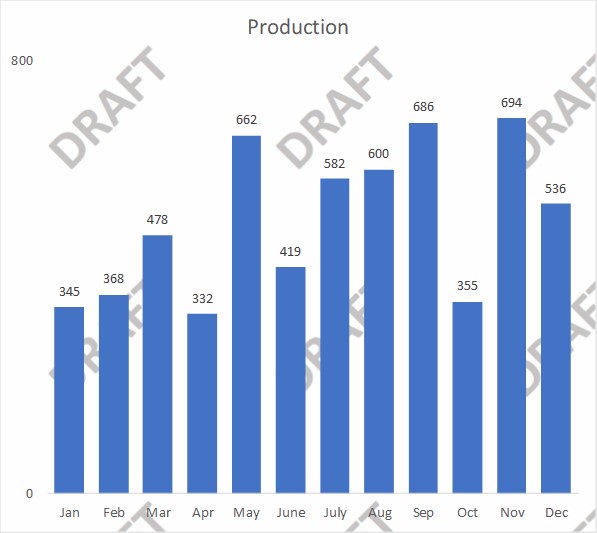
Here’s what a chart in Excel looks like after using these steps.
Sending the chart to others
If you send the Excel or PowerPoint file with the chart in it, others can edit the background fill to remove your watermark (as described below) so consider whether you want to allow this option. If you are emailing the chart or sending it in Slack, Teams, or another application, you will copy the chart from Excel or PowerPoint and paste it as an image. The image can’t be altered by those who receive it.
Removing the watermark
If and when you are ready to remove the watermark, just change the chart background fill to a solid color using these steps.
- Click on the chart border to select the Chart Area and not any of the individual elements.
- Press Ctrl+1 to open the Format Chart Area task pane.
- In the Fill section of the Fill & Line group, select the Automatic radio button to reset the fill color to the default.
Downloads to test
If you want to test this out, right-click here to download the Draft watermark I used above as a PNG file with a transparent background or right-click here to download it as a JPG file with a white background.
More complex watermarks
As I suggested in the section on creating the watermark, you can include icons, images, or other elements when creating a watermark. Group all of the elements into a single group and save that group as the image file. Then you can use the image file as described above. Be careful not to get too complex with the watermark as it is likely just temporary until either the data is updated or the information can be shared.
When you need someone to know there are restrictions on a chart, add a watermark using the steps in this article.

Dave Paradi has over twenty-two years of experience delivering customized training workshops to help business professionals improve their presentations. He has written ten books and over 600 articles on the topic of effective presentations and his ideas have appeared in publications around the world. His focus is on helping corporate professionals visually communicate the messages in their data so they don’t overwhelm and confuse executives. Dave is one of fewer than ten people in North America recognized by Microsoft with the Most Valuable Professional Award for his contributions to the Excel, PowerPoint, and Teams communities. His articles and videos on virtual presenting have been viewed over 4.8 million times and liked over 17,000 times on YouTube.