One of the elements you will want to include in a document or presentation is a “picture” of a screen from the Web or an application. It shows exactly what you are talking about, and in this case a picture can be truly worth a thousand words. The problem is how get the screen shot into a document or presentation.
One way to capture a screen image is to use specific screen capture software. The one I use is called SnagIt. This allows me to specify the portion of the screen that I want to capture and copy it to the Windows clipboard. I can then paste the image into any other application. I use this type of software because I need to insert many screen shots when writing training workbooks. The downside is that I have to pay for the software and I can only use it on the computer that it is installed on.
There are two other methods for capturing screen shots that are built into every version of Windows but they are not well known. The advantage to using these methods is that they are free and they work on any Windows machine you are using, you don’t have to have the specific software installed.
The first is a method that captures the entire screen, including the launch bar at the bottom and any part of the desktop or other applications that you may have running. An example of this is shown in Figure 1 below. To capture the entire screen to the Windows clipboard, get to the screen you want to capture and press the Shift-PrtSc key combination (hold the Shift key and press the Prt Sc key). Then you can switch to the application you want to use the screen shot in and paste the image from the clipboard.
The second method is similar to the first except that it captures only the active application window, not everything else that may be on the desktop. This is probably more useful for most cases where we want to show a specific Web page or screen in an application. An example of this is shown in Figure 2 below. To capture just the application window screen shot, get to the screen you want to capture, make sure it is the active window (the title bar should not be dimmed) and press the Alt-PrtSc key combination (hold down the Alt key and press the Prt Sc key). Then switch to the application you want to use the screen shot in and paste the image from the clipboard.
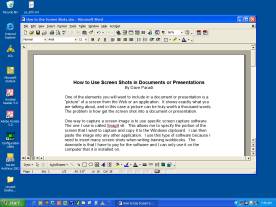 |
| Figure 1 – Entire Screen Capture |
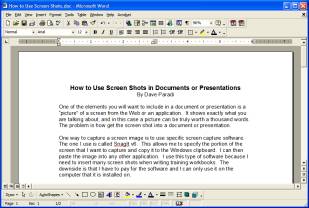 |
| Figure 2 – Active Window Capture |
If you want to show only a portion of the screen shot in the document or application, you can size or crop the image once it has been pasted. Click on the image to select it and you will see the corner and side handles displayed. You can then grab a corner handle with your mouse and drag it to make the image bigger or smaller. I always suggest using a corner handle so that the image aspect ratio (height to width) is maintained. To crop the image, use the Crop tool on the Picture ribbon. This gives you black cropping handles on the image that you can drag to crop from any side or corner.
If you want to edit the image, you can paste it into a graphics program such as the Paint application that comes with Windows and edit the image there. You then need to either copy it from the graphics program to your document or presentation or you can save the image as a graphics file and then Insert the graphic file into your document or presentation.
Remember that when you are using screen shots, not to violate copyright laws by using a copyrighted image, diagram or cartoon without permission.
Did you find this article helpful? If so, click here to check out some great learning tools to help even more!

Dave Paradi has over twenty-two years of experience delivering customized training workshops to help business professionals improve their presentations. He has written ten books and over 600 articles on the topic of effective presentations and his ideas have appeared in publications around the world. His focus is on helping corporate professionals visually communicate the messages in their data so they don’t overwhelm and confuse executives. Dave is one of fewer than ten people in North America recognized by Microsoft with the Most Valuable Professional Award for his contributions to the Excel, PowerPoint, and Teams communities. His articles and videos on virtual presenting have been viewed over 4.8 million times and liked over 17,000 times on YouTube.